I had so much response and many questions about the information I posted about my clavicle break and surgery that I decied to add a little depth to what I posted previoulsy.


 Below
is an X-ray of my more recent left clavicle fracture before surgery. Can you believe
that that at the ER they could not find a fracture? Having broken my right clavicle
twice and knowing exactly what that feels like I actually demanded that they
take me back to get it X-rayed a second time after being told that they did not
see a break. After the second X-ray session they saw what I have marked in red
below and determined there was a crack. The red arrow points to what was determined
to be crack in my clavicle. Keep in mind that the bone is completely ripped apart into two pieces.
Below
is an X-ray of my more recent left clavicle fracture before surgery. Can you believe
that that at the ER they could not find a fracture? Having broken my right clavicle
twice and knowing exactly what that feels like I actually demanded that they
take me back to get it X-rayed a second time after being told that they did not
see a break. After the second X-ray session they saw what I have marked in red
below and determined there was a crack. The red arrow points to what was determined
to be crack in my clavicle. Keep in mind that the bone is completely ripped apart into two pieces.

Take a look at
the second X-ray. My clavicle is in virtually two equal pieces.


I
fractured my right clavicle for the first time in 1990 when fell off a motor bike at a high speed in
some sand dunes. I am very lucky I did not break my neck in that collision. I
do not have those X-rays anymore, but I remember that my clavicle was broken into
several pieces. I was treated by a family physician for this injury. I did not
see an orthopedist. This fracture took several months to heal and knowing what
I know now, I know that is a miracle that my right arm works as well as it
does. Thank goodness I was young and my Father in Heaven saw fit to return me
to my original strength.


Below is my present day right collar bone.

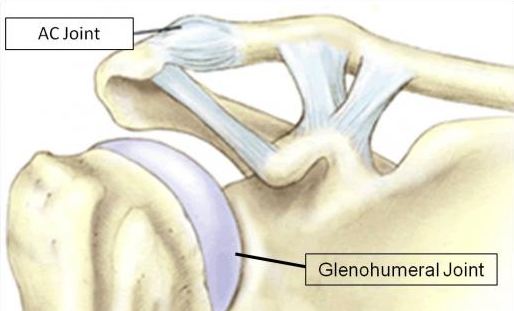
Below is a diagam of a posterior view of the clavicle showing the ligaments, and if you look at my X-ray above you can see
how the ligaments pulled the breakage down.
My second right clavicle break happened ten years later and looked something similar to the diagram below. Surgery was not an option because of the proximty of all the ligament attachments. I was once a gain lucky that it healed properly.


I
also had another bike crash crossing the street in the fall of 2001 about 6 months after breaking my right collar bone for the second time. I rode
across a construction zone in the dark and managed to ride into an open hole in
the road and broke my left thumb, left wrist, the radius head in my left elbow
and two ribs under my left arm. That was a 5 bone collision. Ironically I was
on my way to the store to buy a light for my bike.
I mention this
crash because it was another example of ER mis-diagnosis. After the crash, when I got up, the first thing
that I knew for sure was that something was not right with my left elbow. That
is why I went to the ER. Because of the intense pain in my elbow, I did not
even notice that I had broken my wrist, my thumb or even my ribs which would
completely fracture all the way through later that night when I went to lay
down. The ER found the wrist and thumb fractures but told me that my elbow
looked ok. They had casted my thumb and wrist and were about to street me when
I insisted that they X-ray my elbow again. It was then that they found the
lateral radius head fracture that traveled lengthwise on my radius.
Based on several experiences I do not trust the ER anymore. My advice is to go see a good orthopedist. This latest crash puts my broken bone count in the double digits. I am starting to think taht I know as much as the people in the ER. I sure hope I am done with breaking bones. I feel like I have had more than my share.
Based on several experiences I do not trust the ER anymore. My advice is to go see a good orthopedist. This latest crash puts my broken bone count in the double digits. I am starting to think taht I know as much as the people in the ER. I sure hope I am done with breaking bones. I feel like I have had more than my share.

Below is a close-up of my Acumed plate installed.

My
titanium plate has locking screws. Locking srews were recently developed because prior to the use of locking screws sometimes screws would work themselves out of
place over time. To combat this problem locking screws are often now used. There
are several types of screws, but the most commonly used in a situation such as
mine are corital and locking screws. Below there are two examples of locking screws on the left and one example of
a non-locking corital screw on the right.


You
can usually identify locking screws on an X-ray by their tightly threaded appearance.
The most recent advances in plate technology involve locking plates. Locking
plates utilize a combination of locking and non-locking screws or all locking screws. A locking screw has a threaded head
which locks the screw into place in the plate itself. The plate has
corresponding threads. The example below demonstrates a plate that can accept
both locking and non-locking screws. The locking screw is depicted on the left,
while the non-locking screw is depicted on the right.


Below is a close up
of a locking screw and plate.

